Hosting a Strapi/NodeJS application on a windows server is not hard but it can be a big task when done with no proper documentation. We started it with using Process Managers which helps in keeping the application running in the production environment. It helps developers to monitor users’ engagement with real-time logging and reporting. There are several NodeJS process managers available, unfortunately, none of them supports hosting on a Windows server. Here are the issues we faced with some of them-
- PM2 – PM2 is a NodeJS process manager with a built-in load balancer. It is one of the most used, highly capable, and well-documented process managers available. When using PM2 to run Strapi application, it worked well for the Linux system. For Windows, it ended up in the npm.cmd error as it has to be run in as a separate JS script. We tried the solution shared here. On trying this one, we came across a new issue where the process was running but the localhost does not connect. With all our failed attempts with PM2 we decided to try another process manager.
- StrongLoop Process Manager – Maintained by IBM, StrongLoop PM is a NodeJS production process manager that helps you to build and deploy your NodeJS application and run its process and clusters in the production environment. This has inbuilt load balancing and allows one to keep track of performance metrics on the application. Unfortunately, it works only for Linux and macOS. It is not supported in Windows as mentioned in its documentation.
Both of the above-discussed process managers are well explained in an article on Strapi blog. But both of them failed deploying a Strapi application on the Windows server
After all our failed attempts of using process managers, we decided to run NodeJS as a service on our Windows machine and then expose it using reverse proxy on IIS
Here are the steps we followed to deploy our Strapi application on the Windows server.
- Launch the server –
Before running your server in production you need to build your admin panel for production.
- Go to your app folder and run the below command
npm install cross-env- Then in your package.json scripts section add the below code.
"build:win": "cross-env NODE_ENV=production npm run build",
- And then finally run
npm run build:win
- Run the server with the production settings
After a successful build, for running the application add the below code in the scripts section in your package.json.
"start:win": "cross-env NODE_ENV=production npm start",
And then run
npm run start:win
This will start your application on the default port 1337 or any other port mentioned in your config file. Your application should be running on http://localhost:1337/
- Create a Windows Service to run our Node.js application automatically
Create a Windows service to ensure your Node.js website is always running and automatically restarted if it ever crashes. There are many tools for this, we will be going ahead with the free tool NSSM (non sucking service manager). You can download it from the official website at nssm.cc.
- After downloading, run the executable nssm.exe from downloads\nssm-2.24\nssm-2.24\win64.
- Stop the Strapi application if it is still running.
- To get the service installation GUI run –
nssm install <serviceName>
- On running the above command, an installation window opens up as below.
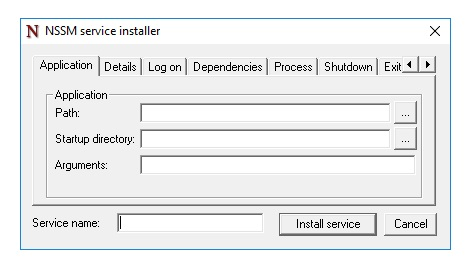
- Enter the application path as the path to your npm.cmd file – C:\Program Files\nodejs\npm.cmd
- Set Startup Directory as path to your Strapi project.
- Set Arguments as “start:win”
- Enter any service name and click on Install service.
- Then start the service by running the below command
nssm start <serviceName>
- To confirm the service status, run –
nssm status <serviceName>
- Go to localhost:1337, your app should be working now.
- Reverse Proxy with IIS
For running the Strapi application on windows, we will create an additional layer of reverse proxy with the built-in web service manager IIS.
- Make sure the IIS is running on your system. You can start it from the “Turn windows feature on and off” setting in windows 10.
- To ensure that IIS is running, the Internet Information Services checkbox should be selected and on running http://localhost.A windows IIS site should appear.
- Install Application Request Routing and URL Rewrite
- Install “Microsoft Web Platform Installer” if not present already. Run the application. If a User Account Control box appears, click Yes. The Web Platform Installer window appears.
- Search by typing “Application Request Routing” in the search box and press Enter.
- Click the Add button in the row labeled Application Request Routing 2.5 with KB2589179. If there’s a newer version, you could choose that one instead.
- Back in the search box, type “URL Rewrite” and press Enter.
- Add URL Rewrite 2.1.
- Click on Install.
- To set up a rewrite URL, Start IIS manager. (If it was already opened, please close and start it again to reflect the installations).
- Go to Sites by clicking on your system name in the Connections pane.
- Under Sites select Default website.
- Double click URL rewrite to open its features. Add a new rule.
- Select Reverse Proxy and then click on OK.
- You will see a window like below.

- Enter the server name or IP address where HTTP requests will be forwarded. This is where your Node.js server is listening. If you set up your environment according to this guide, this will be localhost:3000. You can leave the other options set to their default and click OK.
- We’re almost done. With that rule saved, IIS will proxy any traffic heading towards localhost to localhost:3000. You can test that in your web browser.
That’s all, with all the steps completed successfully, your Strapi application is now hosted on a Windows server. If you are looking for any further assistance with your Strapi or NodeJS application, you can contact the specialists here.